Reading & Note-Taking

Below are some tried-and-true reading and note taking strategies. In addition to the strategies listed on this page, the UVU Assistive Technology Center has a fantastic list of Apps for Student Success, including apps for note taking, speech-to-text, reading and study apps, and more.

One easy-to-access "readability improvement" app on your desktop is Bionic Reading. Try out the Bionic Reading app here

Reading Strategies

Reading is a thought process that involves figuring out what is important, what you need to know, and how you will use the information. Take note of the following basic reading strategies:

  • Read with a dictionary. Look up words you do not understand.
  • Start by becoming familiar with each text. Do a textbook reconnaissance. This can be very short, but find out what is in your text. Insert textbook tabs to make your textbook a useful tool.
  • Asking questions enhances this thought process by focusing your attention on key ideas and the connections among these ideas. You may want to write questions in the margins or make notes. If you do not want to write in your text, use post-it notes or stickies.
  • Make your text your own. Make it a good tool to use for review. Many texts have review sections in each chapter - mark these.
  • After reading your assignment, do not just close the book. Review in your mind what you have read. Tell it in your own words. Look again at the headings, bold face words, and questions. Make sure you understand and know the concepts. Come up with some possible test questions.
  • Reading a science text or math text will probably take you longer than reading a history, English, or other type of text. Make sure you understand the examples and diagrams. Ask for help in understanding. Most instructors are more than willing to help.

SQ3R

Survey: Glance through all the headings in the chapter, and read the beginning and final summary paragraphs. Do not spend more than a few minutes on this process. You should be able to find three to six main ideas that the chapter is discussing.

Question: Begin to work. Turn the first heading into a question. For example, 'Quadratic Formula,' you might ask what is the quadratic formula, how is it used or how is it derived. If your heading reads 'Mason Dixon Line,' you might ask what is it, why was it a compromise, or what were the results of this. Asking questions will arouse your curiosity and thus increase your comprehension. Questions will also make important points stand out.

R1 Read: Read to answer the question, but read only to the end of each section. Search for the answer as you read. This is not passive, but active reading.

R2 Recite: Having read the first section, look away from the book and try to briefly answer your question. Use your own words, and cite an example. If you can do this, you know what is in the text. If you cannot, glance over the section again. An excellent way to do this reciting from memory is to write down short cue phrases. This process involves more senses that will help you remember the material better. Repeat this process with each section until the entire assignment is finished.

R3 Review: When you have finished reading the entire assignment in this way, go over your notes to get a quick look at the points and their relationship to each other. Check your memory by reciting the major sub points under each heading. Try covering up your notes and reciting them, then expose the main points and try to list the sub points.

Textbook Tabbing

Go through your text and use tabs, stickies, post-it-notes, or tape. Mark the beginning of each chapter. If there are reviews in a chapter, tab those. At the end of the book are important appendices you will want to mark. If your book has answers, mark those. If you find some very important information, tab that. You may want to use different colors for different sections, e.g. red for chapters, yellow for reviews, another color for answers, yet another color for the preface information.

The advantages of tabbing:

  • Become familiar with the text
  • Helps you know what you will cover and possibly raise questions to ask
  • Builds a basis to learn
  • Saves time

Reading Comprehension

Reading Control Boxes

Review the chapter or section. Select a logical stopping place in the text, and jot down a small box. Do this for the whole chapter. As you're reading, when you get to the box, stop and think about what you have read. Put it in your own words. Make sure that you understand the material. It may even help to make notes on what you have read. If your box is not in a logical place when you are reading, move it. If you understand what you have read, put a check in the box. But if you don’t, go back and reread, maybe even out loud.

Some of the advantages of this type of reading are if you have to stop reading, you know exactly where you quit and know where to start up again. It is also easier to make sure you focus on what you are reading for a certain length of time rather than focusing on the entire chapter.

By checking for understanding, making notes on what you are reading, and going over you notes when you are done, you have essentially gone over the material four times: reading; vocalizing what is being said in your own words; making notes; going over your notes. This saves you from having to reread the material over and over again!

Note-Taking Skills

There are several styles of note taking which are appropriate for college. Listed at the bottom are some of the methods. Whatever style you choose, here are some basic ideas:

  • Write on only one side of the page.
  • Leave lots of space on each page, for adding headings, making connections, jotting down questions or details later.
  • If you use spiral notebooks, buy the kind that have perforated pages and holes for putting those pages into a three-ring binder. This allows you to tear out pages and insert additional pages, as you process and re-process your notes.
  • Label subject, date, and number each page.

Do

  • Be an active listener
  • Select ideas to write down.
  • Want to pay attention.
  • Go to all Classes
  • Come Prepared
  • Be familiar with the material to be covered in class - read or skim material before class.
  • Sit away from distractions
  • Review your notes soon after class and create a study guide for yourself.

Don't

  • Write every word
  • Do not buy ready-made notes instead of taking your own notes.
  • Be negative.

Reflect, Relate, and Apply

Processing your notes within 24 hours of the class period is a final step in making sure you get the most out of attending each class. Note processing can be divided into three stages: reflect, relate, and apply. Here is an overview of what processing your notes means:

  1. Reflect:
    • Read through your notes. Get a general sense of the material.
    • What is the topic? What is the point of this lecture in the context of the course?
    • Identify parts of the notes. Group information as well as you can, using natural breaks, headings, etc. Review the overall structure and see if it makes sense to you.
  2. Relate:
    • Evaluate your understanding of each piece of information in each group. Can you explain it in your own words? Look up terms and concepts you do not understand.
    • Evaluate the significance of each piece of information in each group. Can you identify the relevance of the information in the context of the lecture and of the course?
  3. Apply:
    • Edit your notes to reflect your understanding. It should now be possible for you to rewrite your notes in a manner that will be useful both now and later. If your notes are clear, you might make connections or groupings, identify examples, or write down your own thoughts directly onto your existing notes. If you find that your notes are not well arranged, you might want to rewrite portions of them, using any note-taking style that seems appropriate for the nature of the material.
    • Review, review, and review your notes.

Cornell Note-Taking System

Cornell University on Cornell Notes

  1. Preparation Steps
    • Divide a piece of paper into three sections.
    • Lecture notes are written in the wide 6-inch column.
    • The narrow column, about 2 inches, is used to write cue words or questions that relate back to the information in the notes.
    • The bottom of the note page is a two-inch sing block or a summary.
  2. Record
    • Write down facts and ideas in sentence or paragraph form.
    • Use abbreviation when possible.
    • After lecture, read through your notes.
    • Fill in blanks and make scribbles more legible.
  3. Reduce or Question (after lecture)
    • Write keywords, phrases, or questions that serve as cues for notes taken in class.
    • Cue phrases and questions should be in your own words.
  4. Recite
    • With classroom notes covered, read each keyword or question.
    • Recite fact or idea brought to mind by keyword or question.
    • Check Answer.
    • Recite each page aloud.
  5. Reflect and Review
    • Think about what you have learned
    • Review your notes periodically by reciting.
  6. Recapitulate (after lecture)
    • Summarize each page of notes at the bottom of each page.
    • Summarize the whole lecture on the last page.

Helpful Hints for Getting Started

  1. Buy a different colored notebook for each class, so that you can tell them apart at a glance. Or, keep a large loose-leaf notebook with dividers.
  2. Make sure you date the notes for each day's lecture.
  3. At the top of each new day's lecture, leave a few lines so that when the lecture is over you can write in the topics covered.
  4. Make use of your own personal short hand system. Use symbols whenever possible. For example: w, w/in, w/o, &, $, #, =, +, i.e. (that is), e.g. (for example). However, you need to make sure you can read your notes later on.
  5. Include illustrations and graphs that your teacher uses to help you remember the context better.
  6. Reread your notes as soon as possible after each class. This one simple thing will drastically increase the amount of material you are able to remember.

First Review: Reading to identify and learn main points. Make incomplete sentence complete, add additional thoughts. Identify central ideas of the lecture.

Second Review: Summarizing - recite the important main ideas of the lecture by summarizing in your own words. The summary can be verbal or written or both.

Third Review: Question and Answer - ask specific questions about the lecture. The questions and the answers to the questions should be written down to be easily accessible for review.


Types of Questions*

  1. How does this relate to me? What is my opinion about this?
  2. How does this compare or relate to what I learned last week? How might this compare to future ideas that I might anticipate? How can I relate this to my other classes?
  3. What is the main idea? What are the supporting ideas?
  4. Why is knowing this important? How can this be used in everyday living? What are some practical examples of how to apply this? What is a practical application that is different from the context in which I learned this?

* Be selective in the question you choose to use, as you do not have adequate time to use them all.

Ways to Improve

  1. Step 1. Record each problem step in the Examples section
  2. Step 2. Record the reasons for each step in the Explanation/Rules using abbreviations, short sentences etc.
  3. Step 3. Record key words and concepts in the left margin either during or immediately after lecture by reworking your notes.
  4. Step 4. Cover up the Examples and Explanations/Rules sections and recite out loud the meaning of the keywords.
  5. Step 5. Place check marks by keywords you do not know, and keep reviewing them until you do.
  6. Step 6. Develop a math glossary for difficult to remember keywords and concepts.

Notetaking Abbreviations

= is, is equal to, is the same

is not, is not equal to

goes to, or produces, results in

i.e. that is

e.g. for example

therefore

w/ with

w/o without

> is greater than

< is less than

n.b. note well, this is important

wrkg working (sometimes eliminating just the vowels may help)

belongs to, is a member of

does not belong to, is not a member of

is contained in

is not contained in

John Sperry Method

Use card in a two-stack study system. The cards you are learning carry with you. The cards you have mastered, place in a review stack to be reviewed weekly. If during the weekly review, you find concepts, etc. you are hesitant about, carry them with you again until you have mastered them, then return them to the review stack.

Note Card Example

Having in mind a clear definition of math vocabulary and concepts is vital for understanding. Use the same two-stack study process for these cards as you do the How to, Understand cards.

Front:
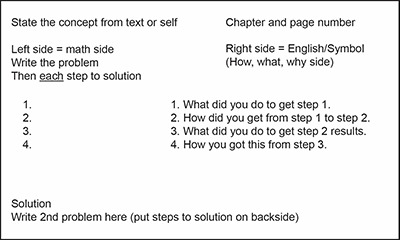
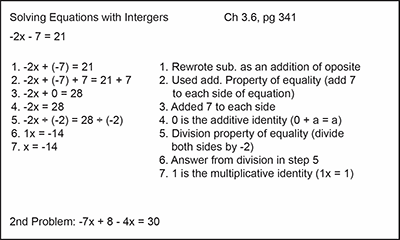
Notecard with concept in top left. Chapter and page number in top right. On the left side, write the problem, and each step to complete the solution. On the right side, write how, what, why you did each step. At the bottom, Write another question to put the solution on the back.

Back:

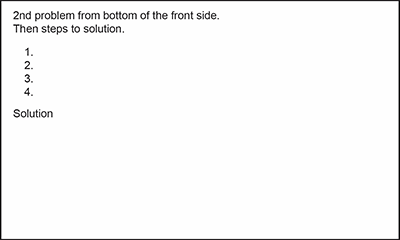
Second problem from bottom of front side. Write the steps needed to solve the problem. Then write the Solution.

Front:

Example Card. Negative two X minus seven equals twenty-one Chapter 3.6, page 341. Required steps to solve the problem. Second Problem at bottom: negative seven X plus eight minus four X equals thirty

Back:

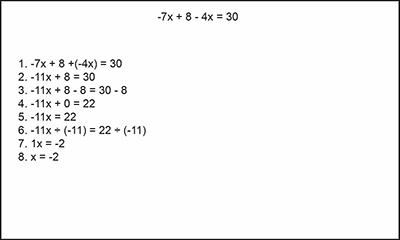
negative seven X plus eight minus four X equals thirty. 8 steps to solve the problem final answer being X = negative two. 


Front:

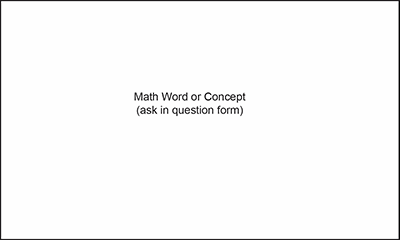
Notecard with Math Word or Concept in center

Back:

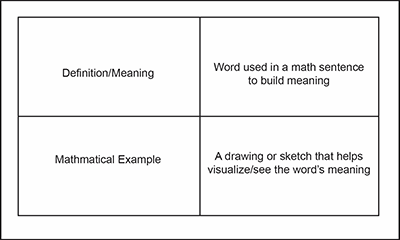
Card divided into four quadrants. Top left: Definition/Meaning. Top right: Word used in math sentence to build meaning. Bottom left: Mathmatical Example. Bottom right: A drawing or sketch that helps visualize/see the word's meaning

Front:

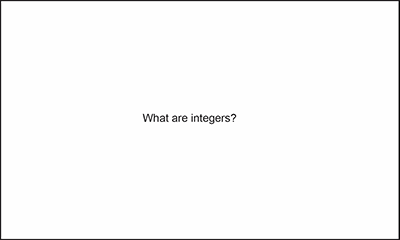
Notecard with question 'what are integers?' in center

Back:

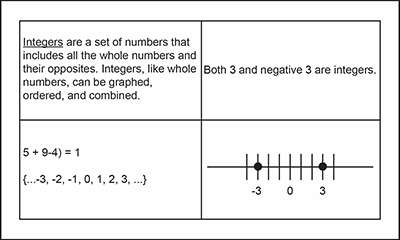
Card divided into four quadrants. Top left: Definition/Meaning. Top right: Word used in math sentence to build meaning. Bottom left: Mathmatical Example. Bottom right: A drawing or sketch that helps visualize/see the word's meaning